 |
| Christmas 2010 |
Wednesday, November 21, 2012
Thursday, November 8, 2012
C.R.A.F.T. Package Pals!

I joined Jamie's Package Pals for October over at C.R.A.F.T. and got to make some fun stuff for Debbie in Florida over at Crafty Rider and got a great package in the mail from her too!

Here's the contents of my package for Debbie. I made her a horseshoe embroidery piece since she's a horse rider and works for a horse rescue. You can read Rescuerider's Weblog here. I also included a mini Christmas wreath and a Halloween craft book since we both love the holidays. I made her a pair of hand warmers since she does suffer from arthritis, 30 seconds in the microwave and they're great for aches or just keeping warm (though it can't get that cold in Florida). I also included 2 origami crane strands which are what's in the Chinese New Year envelopes (Origami is Japanese but really I just don't want the cranes to get bent in shipping).

Here's what the crane strands look like hanging up.

Here's what came in my package from Debbi. I got a total of 7 soaps to try with 6 coordinating washcloths. Debbi said she tried to match the washcloth to the scent, for example there's cinnamon nutmeg for Halloween and cocao mint for Christmas, yum! I also got a great book on wirewrapping, something I've been wanting to try, some peacock feathers that I think I might try making into hair clips of some sort and a really cool little rose ornament that is currently hanging in my craft room window. Thanks Debbi!
Tuesday, October 30, 2012
Pinterest Challenge: Part III
 |
| photo credit: a healthy kitchen |
Another quick pin I decided to tackle was this yummy sounding recipe for Pumpkin Cream Cheese.

It's fall and I love anything pumpkin!! The pin was originally from LaaLoosh which features healthy recipes for weight watchers users. I'm not on weight watchers yet but I'm always on the look out for healthier options. It was quick and easy to mix up. It's great on bagels and my shortcakes that were leftover after we ran out of strawberries. Also, it made a big batch so I get to enjoy this all week!

Pinterest Challaenge: Part II
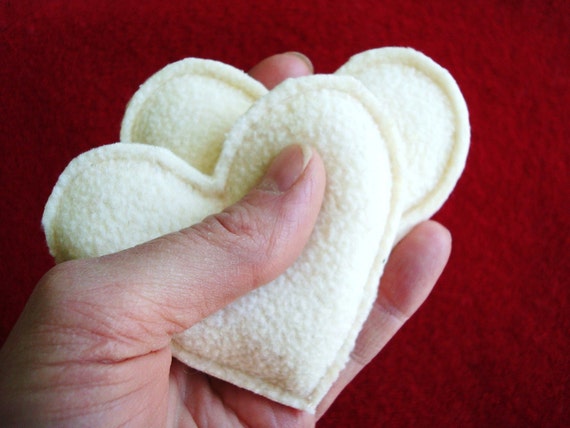 |
Pocket Hand Warmers Fleece VANILLA CREAM Hearts Eco Friendly by WormeWoole |


Pinterest Challenge: Part I
I'm always guilty of coming up with amazing ideas on Pinterest that I never get around to making reality. I've started my own board of pins that I've managed to make reality to keep track of what I've managed to take beyond mere inspiration here. When I look at the difference between what I've pinned to motivate myself and what I've actually gotten done, it winds up being a good motivator to do more and pin less! Since two of my favorite blogs, Young House Love and Bower Power are hosting a Pinterest Challenge I decided to blog about a few small projects I turned from inspiring pins to reality.


I didn't worry about gluing the yarn at first. I tied the yarn under itself and kept wrapping until it stayed in place. I guesstimated the length of yarn I would need to cover the entire ring and was only a bit short. I was able to hide the yarn change by keeping the wrapping tight.

Once the wreath was fully covered I tied down the yarn end but didn't glue anything yet.

I chose to go with some gold ribbon and wrapped it around in the same direction as the yarn.

Once the wreath was fully covered things still looked a bit messy at the top. This is where extra yarn was used in layers to even out the connector for the ring and where I tied the ribbon.

Fortunately I had a little set of these and used them to make a focal point and cover the ugly uneven spot.

I used the trusty old hot glue gun to secure the ends of the yarn, ribbon and add the stars.

I had already glued my first star when I realized I wanted to add a hanging ribbon.

I added all three stars in a group.

My final mini wreath all set for Christmas! I'm going to make all the leftover rings into these!
When I saw a pin for these miniature Christmas wreaths made from old
shower curtain rings I got really excited since I had just found a set
we bought and then wound up not using when the curtain we bought came
with coordinating rings. The original tutorial came from Smile Like You Mean It. I decided to make a few to start preparing for Christmas.
I didn't worry about gluing the yarn at first. I tied the yarn under itself and kept wrapping until it stayed in place. I guesstimated the length of yarn I would need to cover the entire ring and was only a bit short. I was able to hide the yarn change by keeping the wrapping tight.
Once the wreath was fully covered I tied down the yarn end but didn't glue anything yet.
I chose to go with some gold ribbon and wrapped it around in the same direction as the yarn.
Once the wreath was fully covered things still looked a bit messy at the top. This is where extra yarn was used in layers to even out the connector for the ring and where I tied the ribbon.
I used the trusty old hot glue gun to secure the ends of the yarn, ribbon and add the stars.
I had already glued my first star when I realized I wanted to add a hanging ribbon.
I added all three stars in a group.
My final mini wreath all set for Christmas! I'm going to make all the leftover rings into these!
Sunday, October 28, 2012
Weddings: A Gift for the Bride Part 3

Wedding Gift II
 |
| The finished portrait |
After transferring the image I made in the last post onto cloth with my trusty Aunt Martha's Transfer Pencil, I sewed up the image and here's what was left. It's not a perfect reproduction but it's an artistic portrait of the happy couple that's about to say "I do." I wanted to frame it and here's a quick tutorial on how I frame an embroidery piece in an embroidery hoop.

I always wash my pieces after I'm finished sewing to remove any stencil marks still showing. Even after my first time washing this piece there were some stains left behind that fortunately came right out with oxy-clean stain remover (which did not work on the handkerchief, boo!).
First, find a hoop that you're not going to use for future projects, I picked up a wooden one that's a bit large for me to work with when sewing but is the perfect size for this portrait. I actually bought the hoop before I started sewing to make sure I sewed to the appropriate shape and marked it on the cloth.

Take the inside hoop (the solid ring) and use a paintbrush to apply a coat of glue to the outside edge of the ring. From here you want to move quickly so the glue doesn't dry before the cloth is in place.

Carefully lay the image on top of the ring and align it as closely as possible to where you want the image to sit in the hoop.

Unscrew the outer hoop as far as you can and place it around the inner hoop with the cloth in place. Pull the cloth to adjust the placement of the image if you need to.

From here, you'll want to tighten the hoop at the start pulling the cloth around the edges to stretch the image till there are no wrinkles in the fabric and the image is in it's permanent spot. Leave the glue to dry for a few hours or overnight.

Now use a rotary cutter or scissors and slice off the excess fabric and voila, you're done!
Subscribe to:
Posts (Atom)