Thursday, September 27, 2012

Weddings: A gift for the bride

This pic is one of the funnier ones from my wedding taken by my friend Meg right after we said "I do"


I love weddings!  They're all about having fun and making things beautiful for two people who love each other.  I was never the girl who fantasized about the big day before I got engaged, but I've found that everyone I know who gets married becomes something of a wedding expert after it's over and I am now a fully fledged wedding nut.  I will give anyone who will listen all kinds of advice on how to handle their wedding, despite the fact that my mom, a former wedding planner, took care of all the nitty gritty details for my own ceremony.

Two of my favorite friends have decided to officially tie the knot this October after being together for over a decade.  I’m super excited since these are two of my craftiest/most stylish/most creative friends so I know their wedding is going to be amazing!  I've been trying to come up with the perfect gift to get/make for these two.  Recently, I had a brilliant idea! Two, actually, but we'll focus on just one today, a little extra gift for the bride.

My handkerchief from my wedding

So I’ve been married almost 2 years now.  My husband and I are actually running away for a long weekend to celebrate our anniversary this weekend and I can’t wait!!  I remembered that one thing I had at my wedding that I hadn’t thought I needed but turned out to be really great was a handkerchief

I found a vintage lace handkerchief at Kudzu Antiques Market in Decatur the summer before my wedding and picked it up on a whim.  It was just so pretty and elegant and even though I’m not really a happy crier, I decided to pick it up since it just screamed Bridal.


Another photo by Meg prior to some cake smushing

As it turned out, I didn’t cry, not once, I laughed a lot, but no tears.  Even with dry eyes, the handkerchief turned out to be surprisingly helpful.  I kept it in my cleavage and therefore had it on hand for dabbing a moist brow right before I walked down the aisle, use as a makeup wipe, and as a cake napkin after a bit of mushing frosting into Zach’s face

I’ve decided to make a black laced white handkerchief to go with their black and white themed wedding.  

I love this quilt square template.  I used it as a template for the handkerchief's cloth and to help cut the border lace.
I already had a yard of this thick black lace on hand so I used the diagonal cross section on the template to help me cut 4 matching lace sides.
I had to trim off the excess lace on the edge since I will be sewing the lace along the edge of the cloth of the handkerchief with no folds of the edges to hide the seams.
Here's the layout.  It was bedtime when I finished the cutting so I've saved the sewing for another day. If it looks good sewn up, I'll probably embroider the wedding date and their initials too.


Here’s hoping it will turn out looking as well made as it will need to be if I'll actually gift this.  This will be a crafty wedding for sure but we’re looking at a more posh style than the typical Homemade look.


Wednesday, September 26, 2012

A little bit of Atlanta: WonderRoot


Last week I stopped by the WonderRoot arts center to try and attend their ceramics class.  Unfortunately there was a miscommunication between myself and the teacher so I didn't get to play with clay but I did get to hang out a bit in WonderRoot’s community garden. 


The weather in Atlanta is perfect right now, temps in the mid-high 70’s all day, cooler nights that are perfect for snuggling up under a blanket.  This is the time of year I can’t stand to be indoors!


I love the mix of a community garden, painted found objects, and graffiti.  I’m not sure if the graffiti was done by an artist for WonderRoot or if it was already there.


There is a usable swing in the garden but the hammock was looking a little worse for wear…


This little guy followed me around crying.  He was shy at first and kept a good distance but he eventually came up to where I was and lay down next to my truck.  I’m guessing he gets fed by someone around there on a regular basis.  He was most displeased that I hadn’t brought him anything.


If you're in Atlanta and haven't checked it out yet be sure to stop by! Check out their website here.


Sunday, September 23, 2012

Art Doll House

I've always loved miniatures. I put away my doll house when I reached my teen years but it's still all in storage, waiting to be rescued when I have a little girl (who probably won't like mommy playing with her toys more than her). Recently, I stumbled across images of fairy houses on the internet. Many are set up as little doors into tress or just the outsides of the houses but a few are like little doll houses themselves set up for fairies to come in and relax. I saw one in particular that was covered in moss and looked so cute. When I saw this little house for sale in a consignment shop, I couldn't resist. I'm going to try to make it into an "art" doll house, or a home for fairies. What do I mean by an "art" doll house? Mainly that I'm going to try to make most of the furniture that goes into it rather than buying it and decorate it as a whole to look very ethereal and whimsical. Who know what I'll wind up with, it might be a disaster but I have found that moss is surprisingly easy to work with. Just get a glue gun and pin it down. It's naturally messy appearance makes any arrangement look great! More updates to follow.

Tuesday, September 18, 2012

Vote for Kindey Donor


My husband's aunt, a nurse, donated her kidney to a patient this year.  I'm voting for her everyday since she's in the running for an award for being an amazing nurse and wants to use this notoriety to continue to support and promote living organ donations!  Please vote for Allison Batson at http://www.amazingnurses.com

Monday, September 17, 2012

Getting Tattooed

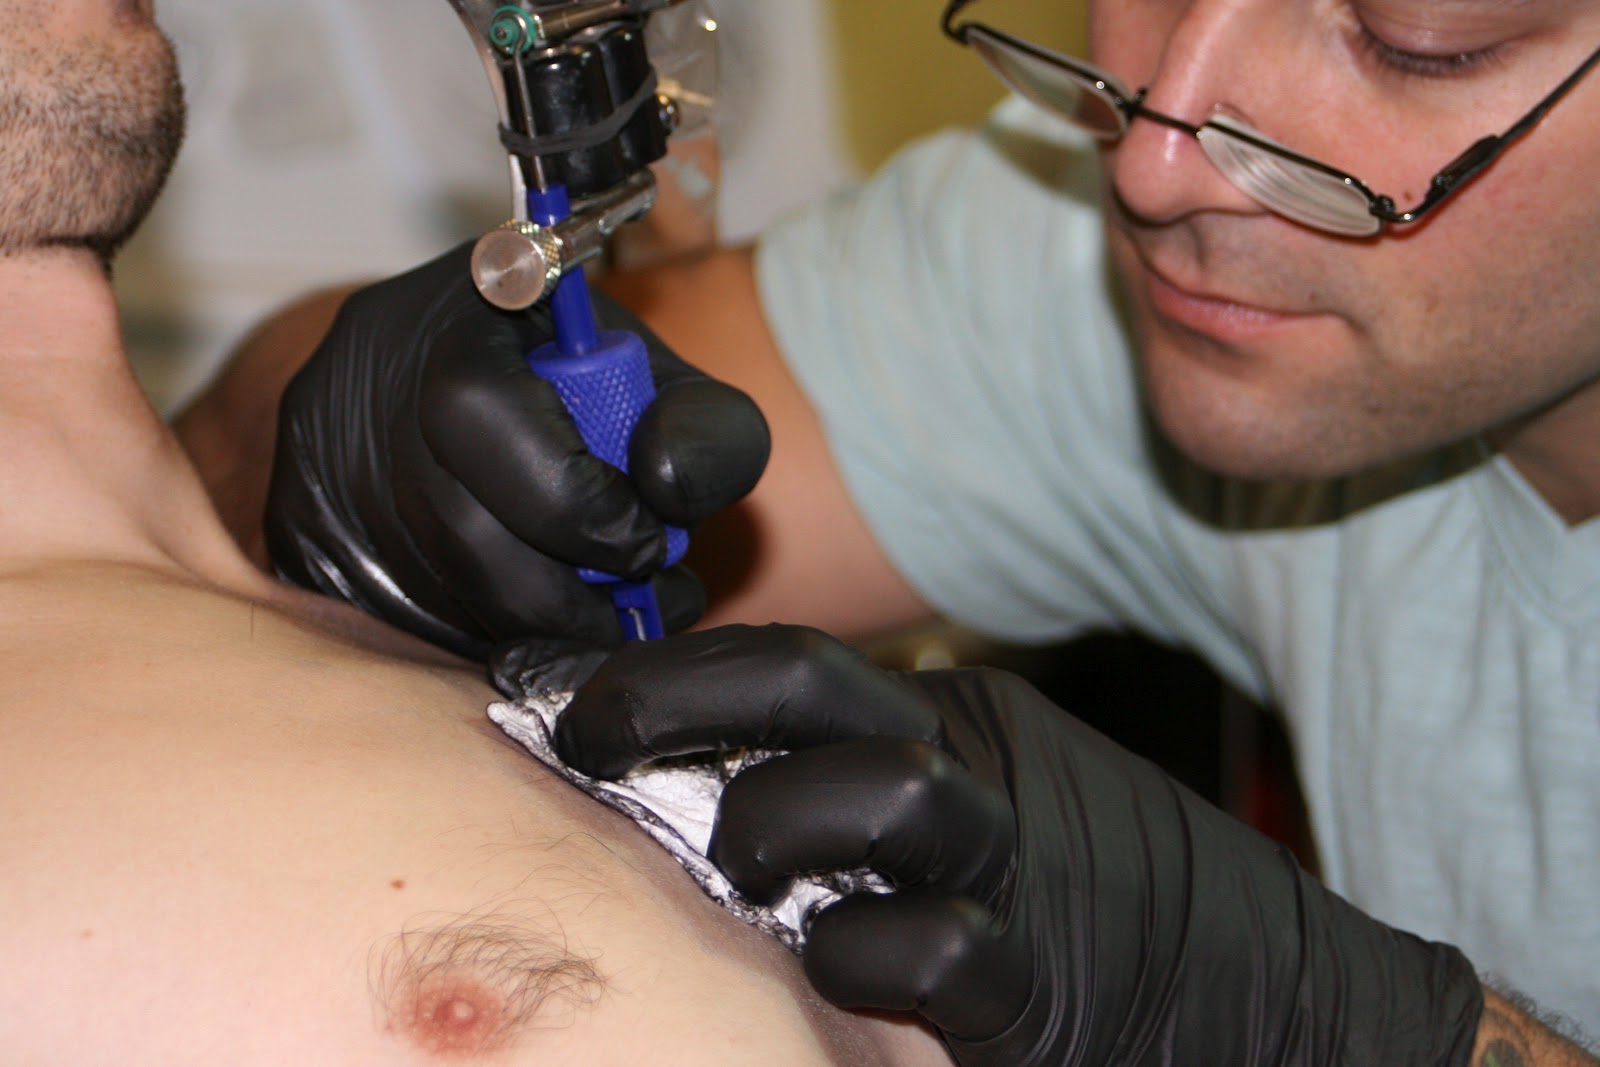
If you've never gotten a tattoo before, here's a step-by-step of what you can expect to happen when you actually get tattooed.  There are a lot more details I want to write about later like choosing a shop and an artist, tattoo etiquette but for now, let's just go over what to expect when you sit down in the chair.

Step 1: The Stencil

Matt Strauser of Rubicon Tattoo

After working out your artwork with your artist, they will draw an outline of what you are getting done and have it printed out on a temporary stencil that they can affix to your skin so you get the chance to review the size and placement of your tattoo.  This is your chance to change your mind to go bigger, smaller, etc.  This stencil rubs off  and can be reused a couple of times until you get it perfect so don't be afraid to say if you want any changes made, this is permanent!

Matt Strauser of Rubicon Tattoo


Now the actual tattooing begins!

Step 2: The Outline

Your stencil also acts as a guide for your tattoo artist.  However talented they might be, this guarantees they can't make a mistake that you have on your body forever.  They will follow this to create the basic outline.

Step 3: Shading

Matt Strauser of Rubicon Tattoo

See the black shading in the tattoo now, that's shading.  This is where your tattoo artist's talent comes out since they can look at a picture to try to copy the original shading but there's no follow along stencil to guide them.  Also as you can see from this picture, you might bleed a little, no biggie.

Step 4: Color

Photo by Scobey Photography


So the tattoo in the previous pictures didn't have a lot of color since the dog was meant to be black and white (for any video game nerds out there, don't freak out, it's Okami but modeled after our own Husky dog that died) so there's only a little gray in the clouds below him that's not black ink.  For fun with color, here's a tattoo on my back!  The flowers are all Matt Strauser of Rubicon Tattoo, the Skull is Zack Gaylord from their days back at Psycho Tattoo 2.  You can see my really ugly first tattoo, the black stars that will get covered up eventually.  Check out that amazing color!  Doesn't it make you want to forget about that silly little black stamp of a tattoo everyone (including me) gets as their first tattoo and just dive into something big and bright and filled with color?!  This picture is from our engagement shoot with Scobey Photography, they're amazing!

Crochet at the Keyboard

Do you too have a brain-dead office job?  Are you posting on your craft board on Pinterest all day long but never have time to get any of them done?  Do you sit in your cubicle all day dreaming of craft projects you could be at home making?  Then bring your craftiness to work!


I have a phone job so my hands are mostly free but I needed something to keep them busy.  I've heard "idle hands are the devil's plaything" but mostly, they're annoying!  I decided to take up crochet because I love the way it looks and it's an easy way to keep my hands moving/my sanity in check while I dial/wait on hold/leave my 3 bazillionth (it's a number) voice mail of the day.


I love this bag I found at a thrift store the label says "the many moods of Poppy Jones" but I couldn't find a website to go with it.  It's structure makes it the perfect yarn bag to lug around and when I'm at work it hides away perfectly in a file drawer.


I'm making dozens of these simple yarn flowers that I will eventually sew in to one giant blanket.  Check out Skip to my Lou to see some great crochet flower tutorials!


Any suggestions on how many of these little guys I'll need to make before I start sewing?  I began sewing the other day when I realized that if I stuck with only one color, the flowers wouldn't stand out enough so I started crocheting bright white as well as off-white and I'm still way behind my bright-white but I have no idea how many I'll need total so I was just planning on sewing them together with a yarn needle and seeing where I was at.

Monday, September 10, 2012

Christmas is Coming

My husband LOVES Godzilla. I assume this is the same kind of love I have for Hello Kitty or Totoro, just instead of the cute and fluffy, he's more drawn to the scaly and destructive. I decided last Christmas that I would make us both fun stockings and I'm working on his first, (Godzilla) then his little brother's which will be Darth Vader, then our tattoo artist's which will feature Dali, and then maybe one for me. I just can't decide what I want on mine, do I want a specific character like Ponyo or Stitch, or do I want something more generic like Christmas themed owls or a skeleton Santa? Jack Skellington perhaps? We'll see. Here's a bit of Godzilla but I'm unhappy with the cut of the stocking I started with, going to try to rework it to have more of an angle at the toe.


Friday, September 7, 2012

Finding Happiness!

So today, I found out that Quick Trip has cherry and vanilla syrup to add to your soda at their fountains.  I'm guessing it's made from something horrible for you that causes 8 kinds of cancer, etc., etc. but despite that, this made my morning.  I've now finished the humungo cherry vanilla diet coke I bought on the way to work and am actually considering getting another one at lunch...


Another thing I've discovered today is this wall paperfrom Famille Summerbelle.  It's called Un Dimanche à Paris, which translates to a Sunday in Paris. Isn't this the fricking cutest thing you've ever seen?!  Not that I have any idea how to put up wallpaper, or the money to afford this kind if I did, or that even if I did have an accent wall that I decided to splurge on with this stuff that I would put it up in a house I wasn't sure I would be living in until I'm old and gray so that I didn't have to leave it behind *deep breath* but I love this!!!  I think I might have to splurge on the tea towel.

The Best Snack Ever


Above you see an image of the greatest snack ever though of - whipped cream on a banana.  It's taste is reminiscent of a banana split but without the calories.  It requires 0 prep, just spray a bit of canned whipped cream every few bites of banana.  Try it, it's amazing.  I want one now.... why am I at work where there is neither bananas nor whipped cream?!

Trigger Happy II


Here's a quick update from an earlier spray painting adventure.  This cute little shelf is now installed above my sewing machine so I can keep spools and such at hand.  I love the yellow!  It's amazing what a quick coat of Krylon will do.  Never buy cheap spray paint!  It's worth the extra $1 or $2 to get a nice even coat!

Thursday, September 6, 2012

Duct Tape Dress Form II


After posting about my hard work on taping down the dressform, I started stuffing it the very next day.  This took longer and was much more difficult than expected.  The hardest part was making inserts to cap off the holes for the arms and bottom.  I just cut out circles for the arms using foam board and my duct tape sticker for a stencil.


The base was harder because I obviously didn’t want it to be a round circle.  I decided to cut a general oval shape and use the tape to finish off any gaps. I put a hangar into the neck hole so I can hang the dress form up if I need it out of the way (my husband vetoed hanging it from the ceiling on a chain like a pre-electricity chandelier that I could raise and lower as needed).


Once I got the upper holes closed off I put a half oval piece of cardboard on the bottom of the form and started stuffing and stuffing and stuffing.  I went through about 1 and a half of the large 50 oz bags of poly fill, you would probably only need one if you’re fairly slim.  I made sure to really cram around the shoulders and bust area to help it keep its shape.


I closed it up at the bottom with a few more pieces of cardboard and duct tape, placed it on a stool that turned out to put the form at almost exactly my height (yay!), and took a few proud photos (proud of a completed project but if you have any body issues, seeing a pretty accurate model of yourself can be a bit depressing fyi) and called it a day….


*****

…The next morning… *dramatic music* “Dun, dun, dun!” I found an exploded dress form!  Sorry I couldn’t get a better picture of this but the seam along the back had popped open and poly-fill was strewn about the floor!!  The horror!!!


I, being a dummy, didn’t get a better picture but trust me, it was a disaster!  Here you can see how I started to tape my poor shell back together with this black super duct tape my hubby gave me to comfort me in my grieving.  Lesson learned from this: just taping up the seam is not enough – wrap that sucker around and around and around!

I had to take all the stuffing back out, wrap duct tape around the stomach area and re-tape the seam closed.  Then I could begin stuffing again and I hate to admit it but the left shoulder is a bit wonky from the experience.  It’s slightly concaved but I think it will still work fine for checking dress straps as I try to resume my self-teaching of how to sew cloths.  What I’m saddest about is that there is how lots of black tape over my cute pink tape, in a circle around the stomach and all over the back and low and behold – Duck Tape appears to no longer be making this tape!!! I can only find it for around $8 per roll with shipping on ebay and I’m just too cheap for that, leaving my poor dress form looking a lot shoddier than I had hoped but still working.


I will probably eventually pick up 3 rolls of a different color and re-wrap it in one style but if you decide to do this project, don’t make my mistake of getting too excited about putting on the cute tape!  Wait till you’ve cut off the form and securely closed the seam with several layers.  Then wrap around the whole form like a belt at several points to keep the seam from splitting open before you add cute decorative tape!

Wednesday, September 5, 2012

Christmas in July II


Update on my Christmas tree pillow: embroidery, done! Making it into a pillow is on the way!


So I haven’t been posting in a few days and above is the reason why.  When I came home on Friday, this lost and lonely little girl followed me into my house and has been driving my two sweet older dogs crazy!  She’s very sweet and affectionate but I don’t think we’re going to be able to keep her.  She is just stressing out our dogs too much (us too, a puppy is a lot of work!).  We’ve done all we can to spread the word looking for her original owner but no such luck!  If you know of anyone in Atlanta or the surrounding area who can give this sweet little girl a good home please let me know!