Tuesday, October 30, 2012

Pinterest Challenge: Part III

photo credit: a healthy kitchen


Another quick pin I decided to tackle was this yummy sounding recipe for Pumpkin Cream Cheese.


It's fall and I love anything pumpkin!!  The pin was originally from LaaLoosh which features healthy recipes for weight watchers users.  I'm not on weight watchers yet but I'm always on the look out for healthier options.  It was quick and easy to mix up.  It's great on bagels and my shortcakes that were leftover after we ran out of strawberries.  Also, it made a big batch so I get to enjoy this all week!

Pinterest Challaenge: Part II

Pocket Hand Warmers Fleece VANILLA CREAM Hearts Eco Friendly by WormeWoole

When I saw a pin for these cute hand warmers, I decided to make my own version.  These are for sale on Etsy on WormeWoole's shop here.  I love the cute heart shape but since I'm less of a pro, I decided to make some little squares instead.

I used an old cotton baby blanket from a thrift store.  Baby linens are amazing because they're always plentiful in thrift stores and are even better used!  I like some of the cutesy animal designs too but this blanket was a nice simple pattern with polka dots.  I sewed two 2.5" squares together leaving a little hole to turn the fabric inside out.  I had to use a piece of paper to make a funnel small enough to fill the packet with a mixture of rice and lavender.  I then sewed the hole to close off the packet.  I made three total.  Two were sent to my package pal which I'll blog about later but I kept one for me.  30 seconds in the microwave and my hands are toasty warm and happy!


Pinterest Challenge: Part I

I'm always guilty of coming up with amazing ideas on Pinterest that I never get around to making reality.  I've started my own board of pins that I've managed to make reality to keep track of what I've managed to take beyond mere inspiration here.  When I look at the difference between what I've pinned to motivate myself and what I've actually gotten done, it winds up being a good motivator to do more and pin less!  Since two of my favorite blogs, Young House Love and Bower Power are hosting a Pinterest Challenge I decided to blog about a few small projects I turned from inspiring pins to reality.


When I saw a pin for these miniature Christmas wreaths made from old shower curtain rings I got really excited since I had just found a set we bought and then wound up not using when the curtain we bought came with coordinating rings. The original tutorial came from Smile Like You Mean It.  I decided to make a few to start preparing for Christmas.


I didn't worry about gluing the yarn at first.  I tied the yarn under itself and kept wrapping until it stayed in place.  I guesstimated the length of yarn I would need to cover the entire ring and was only a bit short.  I was able to hide the yarn change by keeping the wrapping tight.


Once the wreath was fully covered I tied down the yarn end but didn't glue anything yet.


I chose to go with some gold ribbon and wrapped it around in the same direction as the yarn.


Once the wreath was fully covered things still looked a bit messy at the top.  This is where extra yarn was used in layers to even out the connector for the ring and where I tied the ribbon.


Fortunately I had a little set of these and used them to make a focal point and cover the ugly uneven spot.


I used the trusty old hot glue gun to secure the ends of the yarn, ribbon and add the stars.


 I had already glued my first star when I realized I wanted to add a hanging ribbon.


I added all three stars in a group.


My final mini wreath all set for Christmas!  I'm going to make all the leftover rings into these!

Sunday, October 28, 2012

Weddings: A Gift for the Bride Part 3

A quick update: Here's a picture of the lovely bride using my gift during the ceremony - there were a lot of happy tears!

Wedding Gift II

The finished portrait

After transferring the image I made in the last post onto cloth with my trusty Aunt Martha's Transfer Pencil, I sewed up the image and here's what was left.  It's not a perfect reproduction but it's an artistic portrait of the happy couple that's about to say "I do."  I wanted to frame it and here's a quick tutorial on how I frame an embroidery piece in an embroidery hoop. 


I always wash my pieces after I'm finished sewing to remove any stencil marks still showing.  Even after my first time washing this piece there were some stains left behind that fortunately came right out with oxy-clean stain remover (which did not work on the handkerchief, boo!).

First, find a hoop that you're not going to use for future projects, I picked up a wooden one that's a bit large for me to work with when sewing but is the perfect size for this portrait.  I actually bought the hoop before I started sewing to make sure I sewed to the appropriate shape and marked it on the cloth.


Take the inside hoop (the solid ring) and use a paintbrush to apply a coat of glue to the outside edge of the ring.  From here you want to move quickly so the glue doesn't dry before the cloth is in place.


Carefully lay the image on top of the ring and align it as closely as possible to where you want the image to sit in the hoop.


Unscrew the outer hoop as far as you can and place it around the inner hoop with the cloth in place.  Pull the cloth to adjust the placement of the image if you need to.


From here, you'll want to tighten the hoop at the start pulling the cloth around the edges to stretch the image till there are no wrinkles in the fabric and the image is in it's permanent spot.  Leave the glue to dry for a few hours or overnight.


Now use a rotary cutter or scissors and slice off the excess fabric and voila, you're done!


Friday, October 26, 2012

ecofont!

How awesome is this?  A font with invisible holes so you can save ink when printing!!  Get a free holy font here.  Another great Apartment Therapy find!

Weddings: A Gift for the Bride II


This project was a bit disappointing but it's done.  When I tried to use the sewing machine to sew the lace onto the cloth, the machine ate right through the lace so I switched to hand sewing and spent several sick days carefully hand whip stitching all four sides of lace onto the white square followed by hand embroidering the wedding date.

The backside where you can see the whip stitching and the embroidery back

Then I threw it in the wash - a complete necessity since I had been sick while working on it and to my horror, when it came out of the wash, I discovered the black lace had stained the white fabric!!!  Those splotchy spots on the white square are not shadows from the picture but dyed splotches from the lace and despite trying several different cleaning methods, no luck.  Glad this isn't their only gift!  I'm going to give it to my friend anyways since handkerchiefs aren't meant for staying clean but I'm sad I spent so much time and effort on making tiny little stitches only to have the final product turn out so lack-luster!  Oh well, on to better projects!

Saturday, October 20, 2012

Mule Camp 2012

So I've been down and out this week with a bad random cold.  I guess I got a chill last weekend when we headed up to Gainesville for Mule Camp 2012.  My husband is from Gainesville, a town about an hour north of Atlanta, and we regularly go there to visit old friends.  When Zach started saying we should go up for Mule Camp, I had no idea what he was talking about, it's basically a town fair with a carnival attached.  We went up last weekend to check it out.

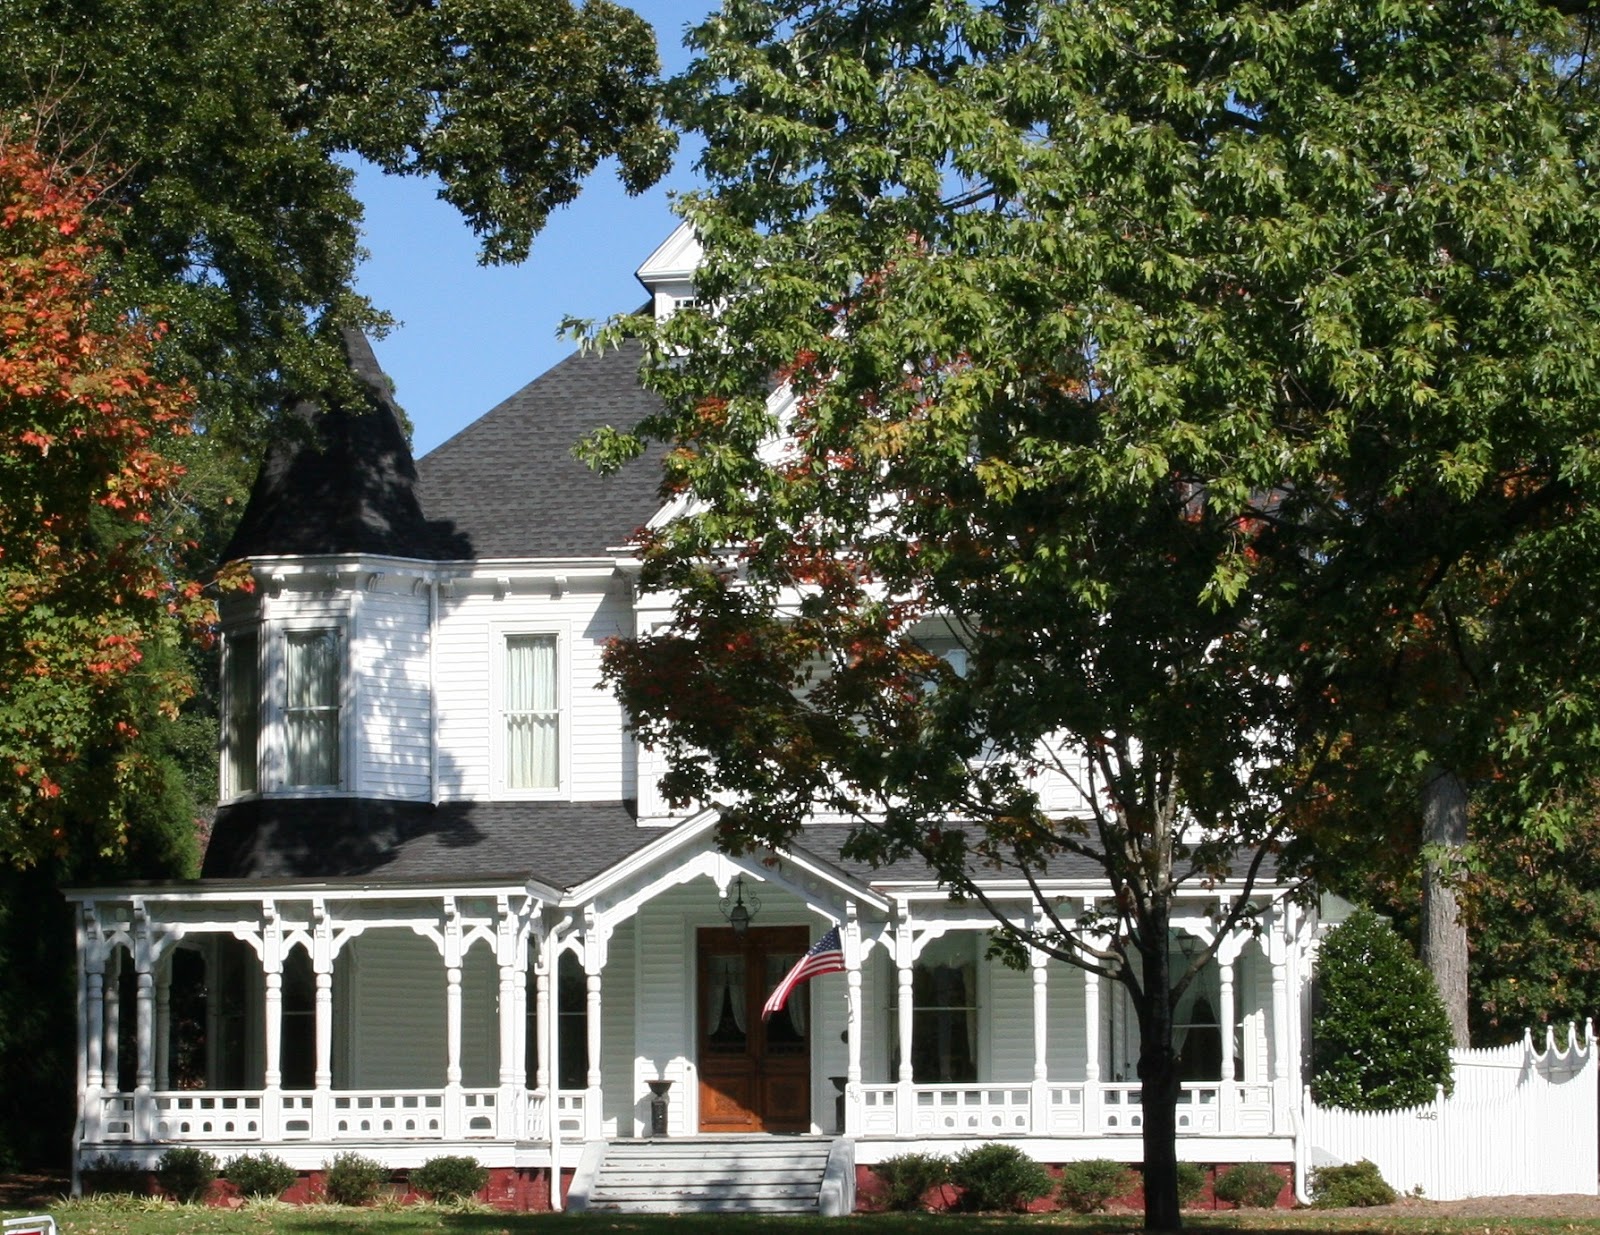
We parked at my brother-in-law's house and walked to the city square and on the way we got to walk down Green Street.  I've always loved driving down this street so it was great to get to walk down it and take a better look.  Green Street is one of those old main streets you find in the south lined with old Southern mansions that have been converted into office buildings and are all painted white for some reason.  You'll find the same thing in Athens, GA, but those mansions have been turned into frat houses rather than businesses.  I took some shots of some of my favorites.


This one below is probably my favorite because of the porch


Here's a detail of the molding


Detail of the Corinthian column


And this isn't a house but I liked the stained glass in this church at the end of Green Street.


When we got to Mule Camp, we met up with some friends first at the Monkey Barrel, the local bar and had a couple of beers before we ventured into the world of fried food.


This is our friend Devon's dog who we got to meet outside the bar.  Adorable!!


Our fried food adventure began with a classic corn dog (each)...

 
followed by some shared ribbon fries...


then we all decided to try a fried oreo which were pretty yummy...


 Elvis was helping out at the funnel cake stand...


So I had to buy a funnel cake from Elvis.  That was it for me but other continued valiantly on.


This final photo is my favorite, my brother-in-law taking on a turkey leg.  We washed it all down with more beer.... hmm... perhaps not my most vitamin filled day ever but a lot of fun!